
The information below will help you to setup a Raspberry Pi with Raspbian OS that will play a slideshow/PowerPoint presentation using a PPT/PPTX or ODP file.
The system will be setup to automatically login to a desktop, load Libre Office Impress (PowerPoint alternative) and run a slide show presentation with custom slide show settings defined.
Please note, MS Powerpoint slideshows might not display 100% correctly in Libre, you can save from MS PP to an open format or to ensure an output as expected, just grab Libre office for PC or Mac, it is Free after all!!
Why:
Instead of using a costly full blown MS Windows desktop PC we can use a Raspberry Pi that not only costs hundreds of pounds less to buy but also consumes a minor percentage of power that a full desktop uses as well as being small enough to attach to the rear of the display device.
Note: These instructions do not cover the use of 3rd party applications, please consult the relevant program guides.
Note: The steps below are carried out using the Raspbian Full image. The Raspbian ‘Light’ version can be used but you will need to install a desktop and more. This will not be covered.
The process order for this task is:
- Install / Upgrade Raspbian OS
- Update Libre Office – Impress
- Apply Raspbian custom settings
- Apply Libre Office Impress custom settings
The Install and the Update
To build an Raspbian Light ‘base image’, where it then can be used for projects like this, see this post about Base Images down for now, sorry.
If your using a previously created base image then run the commands below quickly to ensure everything is up to date:
sudo apt-get update
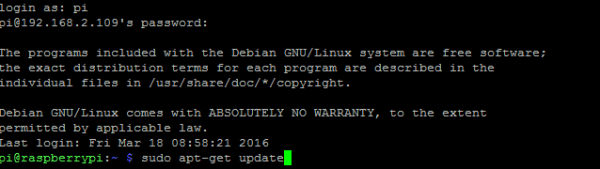
sudo apt-get dist-upgrade
You will be shown ‘Reading package lists… Done’ on successfully completing the update
![]()
sudo apt-get clean
Update Libre Office – Impress
Once Logged in, enter the following commands to update Libre Office to the latest version.
sudo apt-get install libreoffice-impress
![]()
If the latest version is already installed the below output will be shown

NOTE: um, the bit above is abit jumbled, i will redo this asap, try upgrade rather then install for the apt-get above….
Right, that’s an OS and an application to run the slideshow with, next is to get a desktop to boot.
Automatically load file on boot
To run a file automatically at start-up we must place some code into the autostart file.
–norestore is required in the event of an unsafe shutdown, Libre Office will try and restore the file when its next loaded, this process required user interaction.
Navigate to the autostart file located below – this can be done from Putty or locally using the console.
/home/pi/.config/lxsession/LXDE-pi/autostart
Insert the below line into the autostart file.
Note: This will be the location of the presentation that will start on boot.
@libreoffice --show /home/pi/Documents/presentation.ppt --norestore
With things loading to a desktop lets set some Impress defaults to load a file and start it looping in full screen mode.
Impress Custom Macro To Enforce Global Settings
- Start Impress
- Select Tools -> Macros -> Organise macros -> LibreOffice Basic
- In the left pane, select My Macros -> Standard -> Module1
- In the right pane you will get: Main
- Select Edit
- You should get something like:
-------------------------------------------
REM  *****  BASIC  *****

Sub Main

End Sub
-------------------------------------------
Replace the contents with below:
-------------------------------------------
REM  *****  BASIC  *****
REM Set presentation variables for all presentations
Sub Main
Dim Doc As Object
Dim Presentation As Object
Doc = ThisComponent
Presentation = Doc.Presentation
REM Uncomment the line below to make all presentations loop endlessly:
Presentation.IsEndless(True)
REM Uncomment the line below to make all presentations run fullscreen:
Presentation.IsFullScreen(True)
REM Uncomment the line below to remove the 10-second delay:
Presentation.Pause = 0
REM Uncomment the line below to bypass the navigator on program start:
Presentation.StartWithNavigator(False)
REM Uncomment the line below to make sure presentations always run on top:
Presentation.IsAlwaysOnTop(False)
REM Uncomment the line below to change slides automatically rather than manually on all presentations:
Presentation.IsAutomatic(True)
REM Uncomment the line below to allow animations in all presentations:
Presentation.AllowAnimations(True)
REM Uncomment the line below to always hide the mouse during presentations:
Presentation.IsMouseVisible(False)
REM Uncomment the line below to start presentations directly on opening:
Presentation.start()
End Sub
----------------------------------------------
- Save the macro, close the dialog (of course you’re welcome to give the macro a somewhat more informative name than the default)
- Select Extra -> Customize in the menu
- Select the tab Events
- At the bottom of the dialog it says Save In: Untitled1 (or another filename)
- Change Untitled1 into ‘LibreOffice’ (this will save the event in the global configuration instead of the local document)
- Select the event Open Document
- Click on Macro…
- Select your library in the left pane (e.g. My Macros -> Standard -> Module1)
- Select “Main” in the right pane, and click OK. This will assign the macro you just created to an “Open Document” event.
Fingers crossed I have written all this down correctly, restart the PC and away you go!!
Note, I will update this soon, it seems i have missed some bits..
Thanks for sharing this great system.
How can I force Impress to use 16/9 as a format at boot?
Can I do it in a Macro?
I’m using a 16/9 powerpoint file, on Impress the format is slitly wrong.
If I manually set the slideshow in Impress to 16/9 it is correct.
The system should work as stand alone, so a macro would be great.
Grts
hey great post it really helped me out!
Any Clue how to do this with 2 slideshows and make 1 load on virtual desktop 1 and virtual desktop2?
Any ideas or help would be greatly appreciated
thank you for the very useful post…saved a bunch of research and I really appreciate it!
FYI there are a few broken image links and the url to see this post to rpi base images is as well. Looks like they all have blogs (plural) rather than blog (singular) in the url and when changed they all work.
thanks again–M.
Thanks for letting my know, I will update things as it appears it has been of some use to a couple of people rather then just a reminder to myself…
Sorry, this is beyond me. if you find out, jot it down and send us a link! 🙂
To ensure the RPi output is correctly setup (to ensure continuity) checkout this page:
I think you could find some screen options in the impress config settings.
a workaround might be to download impress for pc/mac, load the file, make 16/9 adjustment and then save, the settings maybe in the file itself but impress isn’t converting the PPT file as expected.
If you find out, let us know! 🙂
Actually, looking, you maybe able to play with:
–display {display}
I think you could have 2 scripts that load at startup, 1 points to –display {1} and the other to –display {2}
Just a ponder…
Hi, I have Impress 4.3.3-2 on raspbian jesse, I can’t for the life of me get the loop to work.. I am running the full macro and can tell that other parts work like presentation.start() and do not get any errors, any idea if the parameter is broke or if it requires anything else these days? I assume the most important item in the macro for this is:
REM Uncomment the line below to make all presentations loop endlessly:
Presentation.IsEndless(True)
Adle,
Thanks a bunch for the crisp and exact details in getting this to work. One small correction after the Macro save is step 2
Says:
Select Extra -> Customize in the menu
should say
Select Tools-> Customize in the menu..
I’m getting it to work for a display screen in our local community center to show what’s happening– using a Pi Rasberry Zero W–don’t really need the BT or WiFi but WiFi is needed to do the update steps you outlined (thanks again). Found HDMI screen was blinking every 5-10 seconds, fixed that by specifying a lower frame rate for the monitor in Raspian Configurations.
One question: I got it to boot and run the slide show (must be looped when it is saved !) but now cannot un-do enough to get back to the command window–I can stop the slide show but alas, no Raspian menus. So maybe not a problem for a production kiosk solution but now I’m doing the Shift key and re-installing from the latest NOOBS to get back to development mode. Wondering if you know how to get back the command window intem from a no-menu Raspian?
Hi Chris
With the presentation you want to display loaded, set your desired loop function from within the program itself, and save. Try loading this newly saved file along side the code alteration you have mentioned.
(I think the functions file only gives the ability for that function to be enabled, if already preset)
Take a look at the steps to automatically load a file at boot, if you remove the additions, Raspbian load as it did before.
The process order which I chose was to get a simple test presentation working that looped 3 slides before creating any production presentation on a full desktop PC with Impress installed. So once the load automatically and functions file were set, I never needed to go back to desktop.
I can’t understand why it tells me :
“BASIC runtime error.
Property or method not found: Presentation.”
when I launch my pptx file. Is there someone to help me ?
Thx